
All of the ways to Deploy and Use VPCs in VCF 9 - Part 2: Terraform

In Part 1 of this series, we reviewed the building blocks of VPCs and the multi-tenancy constructs introduced in VCF 9, as well as all of the different platform avenues for using these new capabilities.
In Part 2, we will dive into one of my favorite methods for consuming NSX - Terraform! We will briefly review how to install Terraform and use the NSX Terraform Provider, all of the different Resources and Data Sources needed to deploy VPCs, and then I will present a basic example of how to deploy this in an environment, including the deployment of a Distributed Transit Gateway, VPC, Subnets, and Security Policy.
Installing Terraform
Installing Terraform is super simple and doesn't rely on any server-based infrastructure - in its simplest form it can be installed and used on your local machine.
In my case, I installed Terraform on my Mac using Homebrew:
$ brew tap hashicorp/tap
$ brew install hashicorp/tap/terraform
Of course, there are automated and manual options for several other operating systems. See the official Terraform guide here.
Now that Terraform is installed, create a folder as a working directory for the project files. Using your CLI, change into that directory and test that Terraform is installed correctly by typing:
$ terraform version
Terraform v1.13.2
on darwin_arm64
$
You should receive something back like the following above. This validates that Terraform is installed and is in your executable path. If this doesn't work, double-check that Terraform is included in the PATH.
Terraform has 3 basic steps to deploying Infrastructure as Code:
terraform init
terraform plan
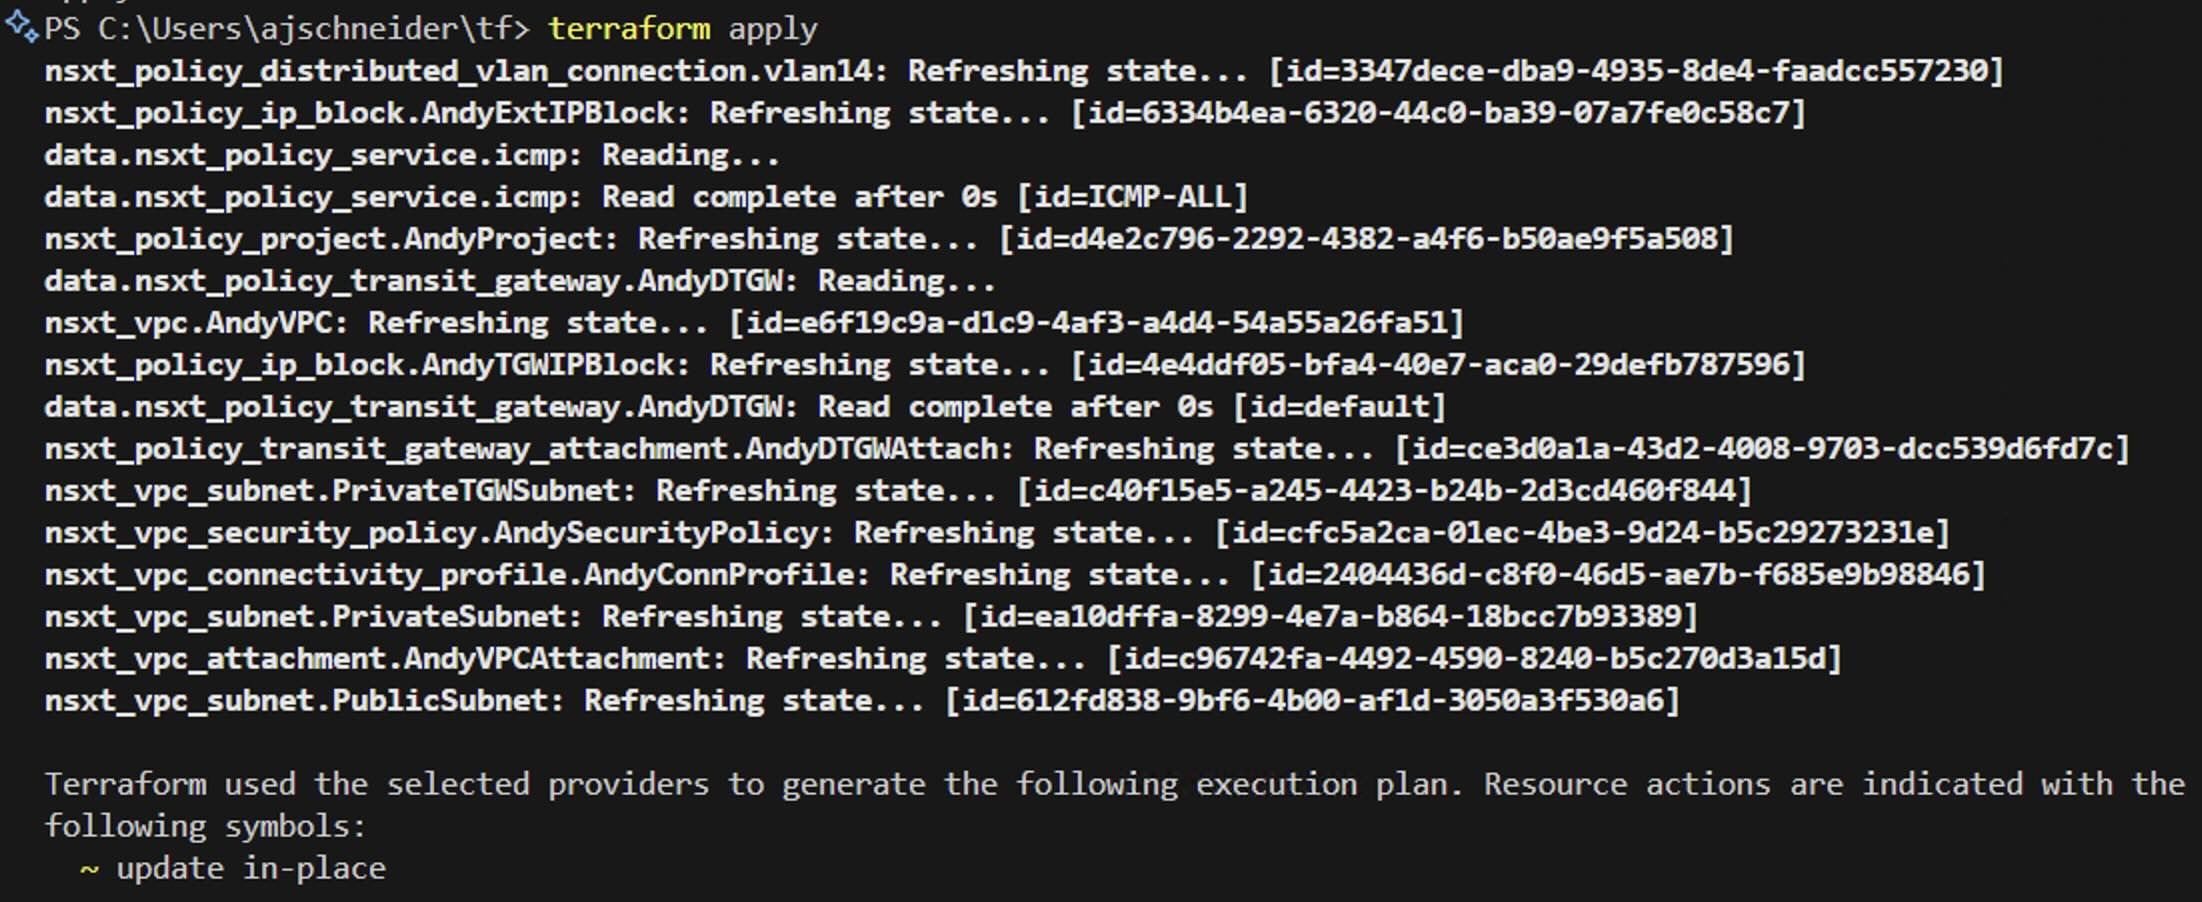
terraform apply
where "init" initializes the directory with Terraform files and downloads any defined Terraform Providers (in this case, the NSX Provider), "plan" connects to the NSX Manager and compares the running configuration to the declarative definition in your Terraform files, and "apply" deploys the configuration changes necessary to match your declarative definition (whether that means creating, changing, or redeploying resources in NSX).
And finally, if you'd like to clear away the configuration deployed by Terraform, you can simply type:
terraform destroy
Installing the NSX Terraform Provider
The NSX Provider is maintained by VMware, but it is available on the Terraform registry here.
In order to setup the NSX Provider for the first time, create a new file called main.tf inside the folder that you created for the project files. Edit that file in your favorite IDE and include and save this minimum config:
terraform {
  required_providers {
    nsxt = {
      source  = "vmware/nsxt"
      version = ">= 3.10.0"
    }
  }
  required_version = ">= 0.13"
}
Once you've edited the file, return back to the CLI and perform a 'terraform init':
$ terraform init
Initializing the backend...
Initializing provider plugins...
- Finding vmware/nsxt versions matching ">= 3.10.0"...
- Installing vmware/nsxt v3.10.0...
- Installed vmware/nsxt v3.10.0 (signed by a HashiCorp partner, key ID ED13BE650293896B)
Partner and community providers are signed by their developers.
If you'd like to know more about provider signing, you can read about it here:
https://developer.hashicorp.com/terraform/cli/plugins/signing
Terraform has created a lock file .terraform.lock.hcl to record the provider
selections it made above. Include this file in your version control repository
so that Terraform can guarantee to make the same selections by default when
you run "terraform init" in the future.

Terraform has been successfully initialized!

You may now begin working with Terraform. Try running "terraform plan" to see
any changes that are required for your infrastructure. All Terraform commands
should now work.

If you ever set or change modules or backend configuration for Terraform,
rerun this command to reinitialize your working directory. If you forget, other
commands will detect it and remind you to do so if necessary.
$
Assuming all went well, you've now successfully initialized the directory for Terraform and downloaded the required NSX Provider from the Hashicorp Registry.
If you'd like to validate, you may simply type 'terraform providers' to see which provider plugins have been downloaded:
$ terraform providers

Providers required by configuration:
.
└── provider[registry.terraform.io/vmware/nsxt] >= 3.10.0

$
Required Terraform Resources and Data Sources
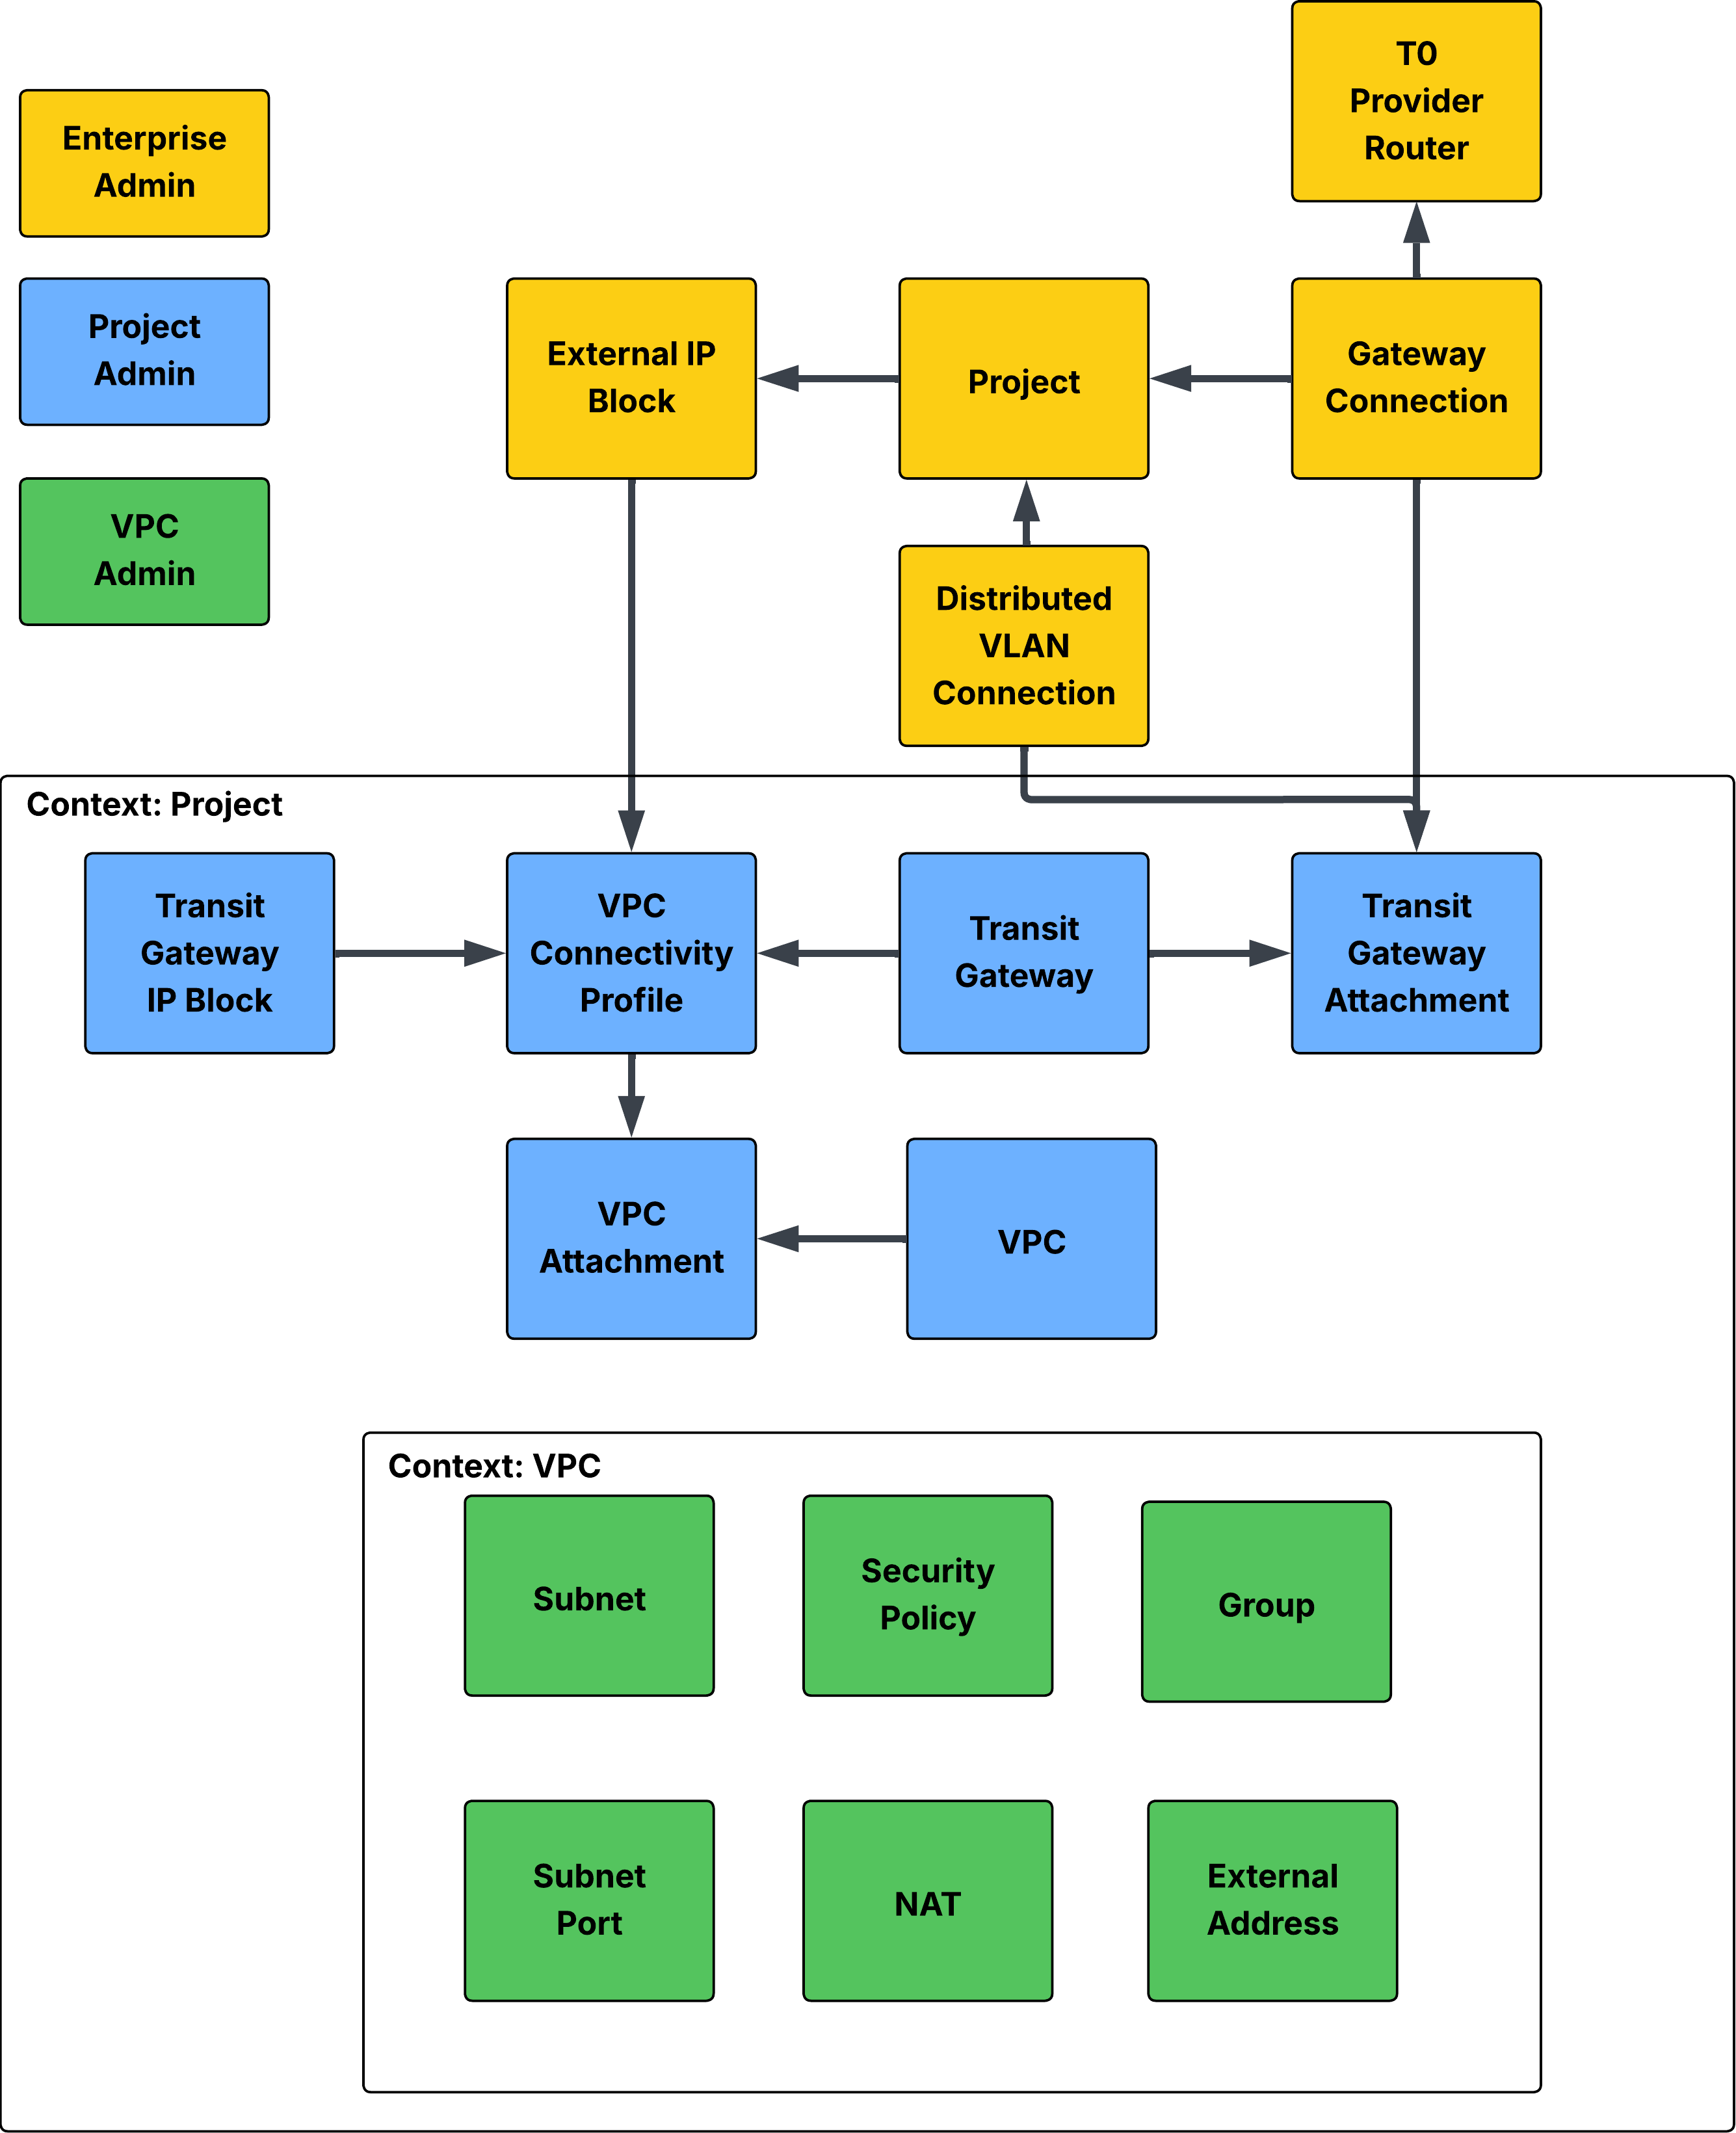
To gain a better understanding of the Terraform Resources necessary to deploy these capabilities, I created the diagram below.
A few things to note:
- The objects are color-coded based on the persona of the Admin who may be creating the Resources (of course, your environment may be different, but this is the intended design).
- The arrows point to the inputs necessary for the specific Resource.
- For the blue and green Resources, there is an additional variable related to the "Context" of that Resource, which ties it to the respective Project or VPC.
- In my case, I decided to deploy the "Distributed VLAN Connection", but you may also choose to deploy the "Gateway Connection" which requires Edges.
VPC Terraform Example
Just like on a cooking show, let's showcase the finished product and then dive into the details. Here is a visualization of what I create in the example:
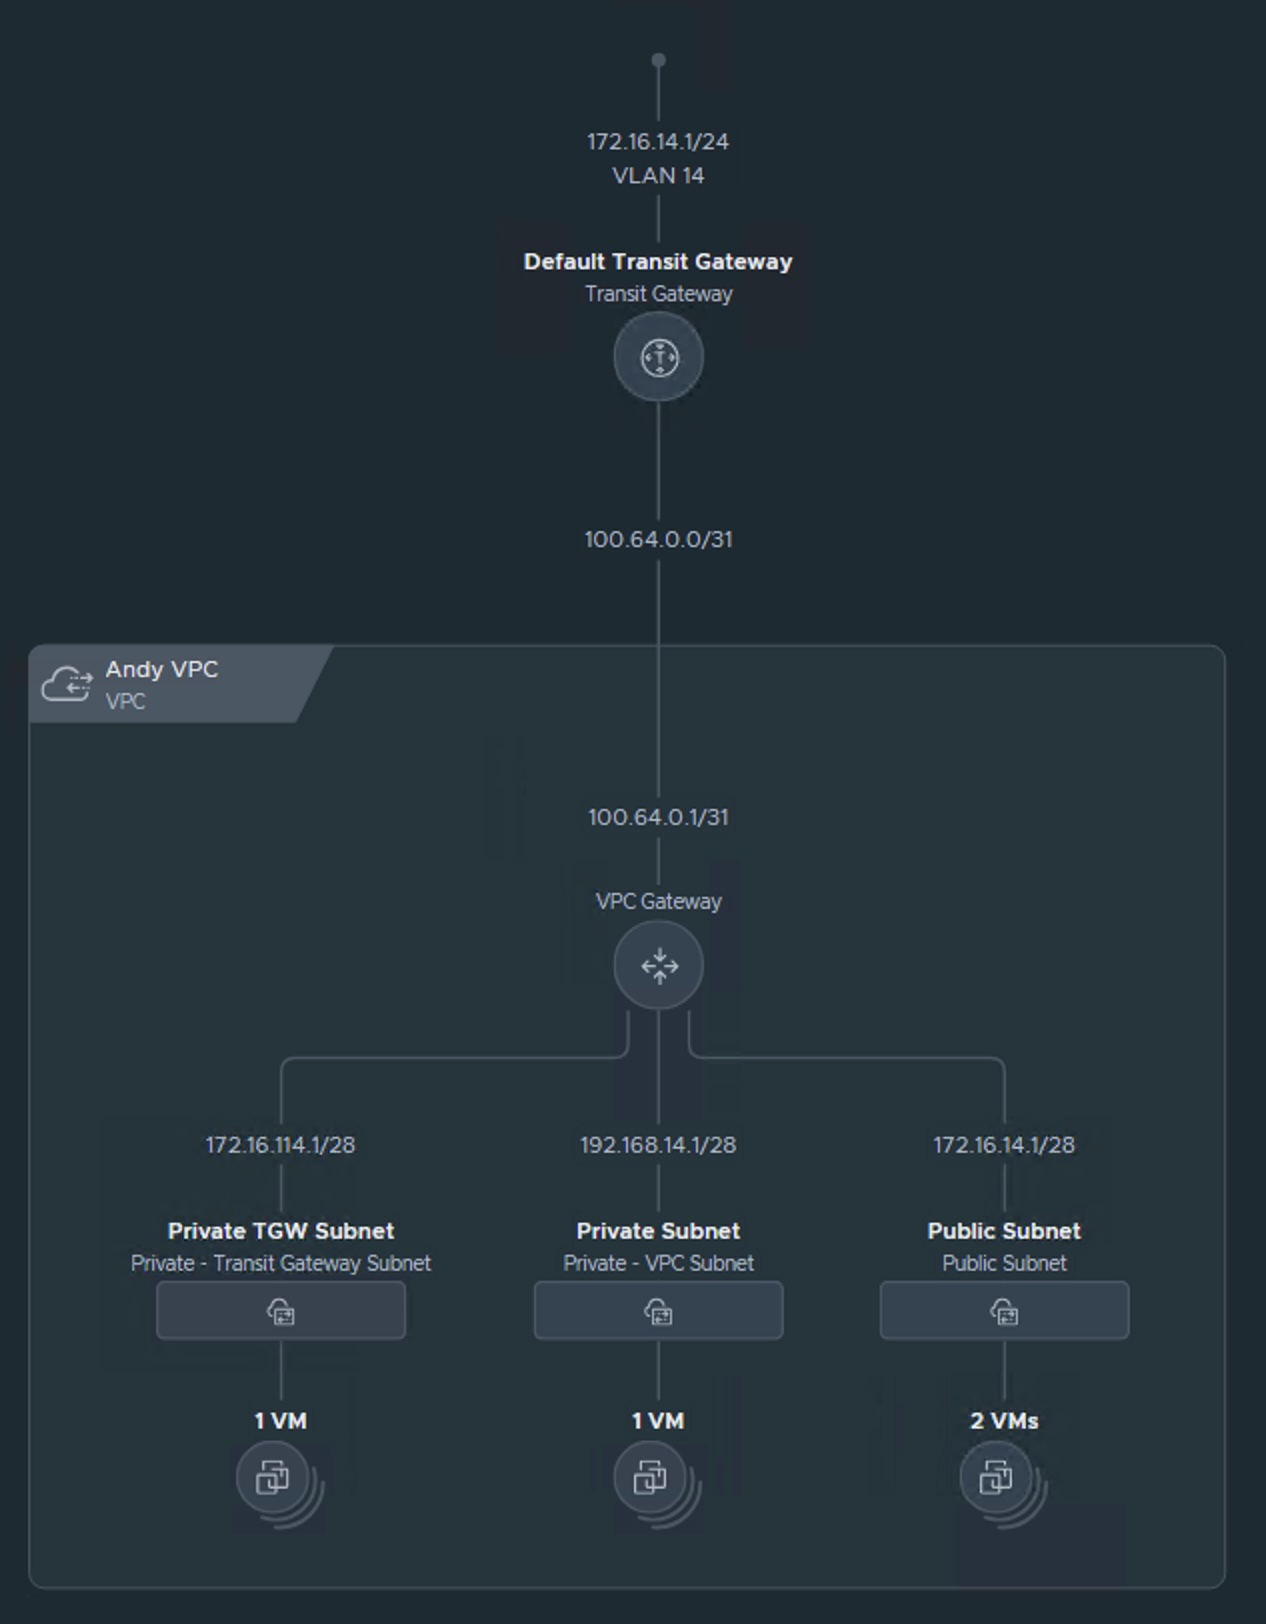
Continuing from where we left off downloading and installing the NSX Terraform Provider, we first define the general Provider variables to connect to our specific NSX instance. In my case, its a lab and not following security best-practices. In your Enterprise environment, ensure you are using good security hygiene:
provider "nsxt" {
  # Example: host = "nsx-manager.example.com"
  host                  = "nsx01.vcf.lab"
  username              = "admin"
  password              = "VMware1!VMware1!"
  allow_unverified_ssl  = true
}
Next, let's add the "Enterprise Admin" Resources (the one's in yellow in my illustration above). The Distributed VLAN Connection Resource defines the VLAN and gateway address hosted by the Top-of-Rack (ToR) switch that will host our North/South connectivity to the Distributed Transit Gateway (DTGW) and ultimately the VPC subnets. The IP block goes hand-in-hand with the DTGW, defining a block of IP addresses that will be used by the VPC Public Subnets and External IP addresses for Private Subnets. Finally, the Project Resource ties the previous two objects together.
resource "nsxt_policy_distributed_vlan_connection" "vlan14" {
  display_name = "VLAN 14 Connection"
  gateway_addresses = ["172.16.14.1/24"]
  vlan_id = 14
}

resource "nsxt_policy_ip_block" "AndyExtIPBlock" {
  display_name = "Andy IP Block"
  cidr         = "172.16.14.0/24"
  visibility = "EXTERNAL"
}
resource "nsxt_policy_project" "AndyProject" {
  display_name        = "Andy"
  short_id            = "andy"
  tgw_external_connections = [nsxt_policy_distributed_vlan_connection.vlan14.path]
  external_ipv4_blocks = [nsxt_policy_ip_block.AndyExtIPBlock.path]
}
We continue by adding the "Project Admin" (blue) scoped Resources that are assigned with the Project context. In VCF 9.0, a Transit Gateway is created by default when a Project is created and only a single TGW is supported per Project, so we pull in that Data Source as opposed to creating a new TGW. A Connection Profile ties together the TGW, TGW Private IPs, and any External IP Blocks. Last, but not least, we add our VPC and assign the Connectivity Profile to our VPC via the VPC Attachment resource.
data "nsxt_policy_transit_gateway" "AndyDTGW" {
  context {
    project_id = nsxt_policy_project.AndyProject.id
  }
  display_name    = "Default Transit Gateway"
}

resource "nsxt_policy_transit_gateway_attachment" "AndyDTGWAttach" {
  display_name        = "Andy DTGW Attachment"
  parent_path         = data.nsxt_policy_transit_gateway.AndyDTGW.path
  connection_path = nsxt_policy_distributed_vlan_connection.vlan14.path
}

resource "nsxt_policy_ip_block" "AndyTGWIPBlock" {
  display_name = "Andy TGW Private IP Block"
  cidr         = "172.16.114.0/24"
  visibility = "PRIVATE"
  context {
    project_id = nsxt_policy_project.AndyProject.id
  }
}

resource "nsxt_vpc_connectivity_profile" "AndyConnProfile" {
  context {
    project_id = nsxt_policy_project.AndyProject.id
  }
  display_name = "Andy Connectivity Profile"
  transit_gateway_path = data.nsxt_policy_transit_gateway.AndyDTGW.path
  private_tgw_ip_blocks = [nsxt_policy_ip_block.AndyTGWIPBlock.path]
  external_ip_blocks = [nsxt_policy_ip_block.AndyExtIPBlock.path]
}

resource "nsxt_vpc" "AndyVPC" {
  context {
    project_id = nsxt_policy_project.AndyProject.id
  }
  display_name = "Andy VPC"
  private_ips = ["192.168.14.0/24"]
  short_id = "andyvpc"
}

resource "nsxt_vpc_attachment" "AndyVPCAttachment" {
  display_name             = "Andy VPC Attachment"
  parent_path              = nsxt_vpc.AndyVPC.path
  vpc_connectivity_profile = nsxt_vpc_connectivity_profile.AndyConnProfile.path
}
Finally, we add our VPC Resources as the VPC Admin persona (green). I add 3 Subnets (Public, TGW Private, and VPC Private) each with their own Distributed DHCP Server! I also add a basic Distributed Firewall (DFW) Rule to block ICMP for any traffic coming in to or out of the VPC. I will leave it up to the reader to add additional Resources for NAT and VM attachment.
resource "nsxt_vpc_subnet" "PublicSubnet" {
  context {
    project_id = nsxt_policy_project.AndyProject.id
    vpc_id = nsxt_vpc.AndyVPC.id
  }
  display_name = "Public Subnet"
  ipv4_subnet_size = 16
  access_mode = "Public"
  depends_on = [ nsxt_vpc_attachment.AndyVPCAttachment ]
  dhcp_config {
    mode = "DHCP_SERVER"
  }
}

resource "nsxt_vpc_subnet" "PrivateTGWSubnet" {
  context {
    project_id = nsxt_policy_project.AndyProject.id
    vpc_id = nsxt_vpc.AndyVPC.id
  }
  display_name = "Private TGW Subnet"
  ipv4_subnet_size = 16
  access_mode = "Private_TGW"
}

resource "nsxt_vpc_subnet" "PrivateSubnet" {
  context {
    project_id = nsxt_policy_project.AndyProject.id
    vpc_id = nsxt_vpc.AndyVPC.id
  }
  display_name = "Private Subnet"
  ipv4_subnet_size = 16
  access_mode = "Private"
}

data "nsxt_policy_service" "icmp" {
  display_name = "ICMP ALL"
}

resource "nsxt_vpc_security_policy" "AndySecurityPolicy" {
  context {
    project_id = nsxt_policy_project.AndyProject.id
    vpc_id = nsxt_vpc.AndyVPC.id
  }
  display_name = "Andy Security Policy"
  description  = "Terraform provisioned Security Policy"


  rule {
    display_name       = "block_icmp"
    action             = "DROP"
    services           = [data.nsxt_policy_service.icmp.path]
  }
If you'd like a copy of the main.tf file to edit yourself, grab it here!
Conclusion
I hope this gave you a taste of the possibilities of VPC creation using Infrastructure as Code with Terraform and VCF, specifically NSX. This may look like more work than using the GUI, but there are immense advantages to using a declarative infrastructure for maintaining policy, compliance, drift remediation, and recovering from a failed environment. Check out my previous post / YouTube video where I give an overview of NSX and Terraform, along with how to integrate it with CI/CD pipelines like Jenkins and Source Control using Git.